Build your own Lithium Ferro Phosphate (LiFePO4) battery pack using a 4S 12.8V LiFePO4 Battery Management System (BMS). Lithium Ferro Phosphate is also called Lithium Iron Phosphate. If you are a beginner and want to learn more about Series and Parallel Configurations, you can check our previous blog. To learn more about Ah, Wh, C Rating please visit this blog.
Lithium Iron Phosphate (LFP) batteries are gaining more popularity after the announcement of Tesla is switching to LFP Chemistry on its standard variants. The LFP is having a cycle life of 2000-3000 Cycles, eco-friendly materials of Iron and Phosphate that are already available in abundance, Increased safety, LFP can also able to utilize the full 100% Capacity of a battery, etc. You can ask why it is not used these days?. It is because LFP patents allowed china to dominate in the market. Now it is about to expire, so in the future, it can be available at competitive prices based on production because iron and phosphate materials are already used in many industries.
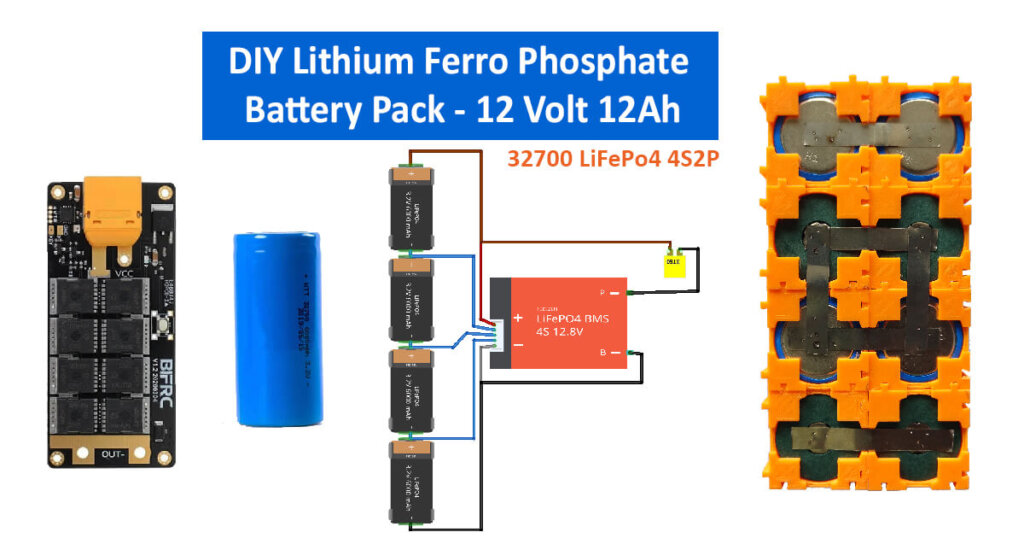
In this blog, we will be making a DIY LiFePO4 Battery pack of 12.8 Volt 12Ah. Additionally, we will be adding a battery management system to balance charge the batteries for the best battery life.
Items required for making a Lithium Battery Pack (LiFePO4):
Below are the required items for making a 32700 LiFePO4 Battery Pack. I have mentioned all the items, but you can exclude the optional and recommended products based on your need. For a DIY Battery pack, spot welding is recommended, but some use soldering with wires, but it won’t last long. So spot welding is recommended.
These are affiliate buying links for both India and US. Refer specifications for your applications
- Solar DC Wire – (Amazon US)
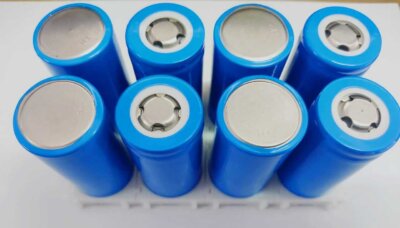
- 32650/32700 Lithium Ferro Phosphate Battery Cylindrical Cells(LiFePO4) x 8 – (Amazon US)
- 32650/32700 Cell Spacer for LiFePO4 Batteries 1×2 Cell Holder x 8 – (Amazon US)
- 12.8Volt 30A BMS or 12.8Volt 20A BMS (Based on requirement, I’m using 30A) – (Amazon US)
- Nickel Strip for Spot Welding – (Amazon US)
- Spot Welding Machine
- Spot Welding Machine (Dual MOSFET array) – (Amazon US)
- 5200mAh LiPo Battery with 40C/80C Rating (What is C Rating, Ah?)
- XT60 Battery Connector (Recommended) – (Amazon US)
- Insulation Gasket for 32700 Batteries (Recommended)
- Kapton Tape (Optional) – (Amazon US)
- HeatShrink Sleeve for Lithium Battery Packing (Recommended) – (Amazon US)
LiFePO4 Cylindrical Cells:
The Lithium Ferro Phosphate is available in Cylindrical Cells with 32mm x 650mm (or) 32mm x 700mm. It is also available in rectangular types called prismatic cells with higher Ah for Industrial use and Machinery.

|
| Rs. 325 | BUY NOW |
|
| $12.50 | BUY NOW |
|
|
out of stock | BUY NOW |
LiFePO4 Battery Specifications (1 Cell):
Nominal Voltage: 3.2 Volt
Charging Voltage (Per Cell): 3.65V
Discharge Cut-Off Voltage: 2.0V
Capacity: 6000mAh (or) 6 Ah
Operating Temperature: Charge: 0 ~ 40° C, Discharge: -20°C ~ 60°C
No. of Quantity Required: 8 Nos. (For 4S2P Configuration)
Absolute Minimum discharge voltage: 2.0 Volt (less than this will not be able to charge again)
What is the difference between 32650 and 32700 LiFePO4 Batteries?
The numbers are used to mention the dimensions of a battery. The 32 denotes the cylindrical diameter in mm (millimeter). 65 or 70 in 650 (or) 700 denotes the height of the battery in mm. These are available in these 2 heights, but the Cell Spacers suits both length as the diameter of both types are the same.
History of LiFePO4
Source: Wikipedia
LiFePO4 is a natural mineral of the olivine family (triphylite). Arumugam Manthiram and John B. Goodenough first identified the polyanion class of cathode materials for lithium-ion batteries. LiFePO4 was then identified as a cathode material belonging to the polyanion class for use in batteries in 1996 by Padhi et al. Reversible extraction of lithium from LiFePO4 and insertion of lithium into FePO4 were demonstrated. Because of its low cost, non-toxicity, natural abundance of iron, its excellent thermal stability, safety characteristics, electrochemical performance, and specific capacity (170 mA·h/g, or 610 C/g) it has gained considerable market acceptance.
The chief barrier to commercialization was its intrinsically low electrical conductivity. This problem was overcome by reducing the particle size, coating the LiFePO4 particles with conductive materials such as carbon nanotubes, or both. This approach was developed by Michel Armand and his coworkers. Another approach by Yet Ming Chiang‘s group consisted of doping LFP with cations of materials such as aluminium, niobium, and zirconium.
Negative electrodes (anode, on discharge) made of petroleum coke were used in early lithium-ion batteries; later types used natural or synthetic graphite.
32650/32700 Cell Spacer for LiFePO4 Batteries:
Cell Spacers are used to arrange the cells for a sturdy and compact look. It is easy to organize and provides equal spacing for safety.
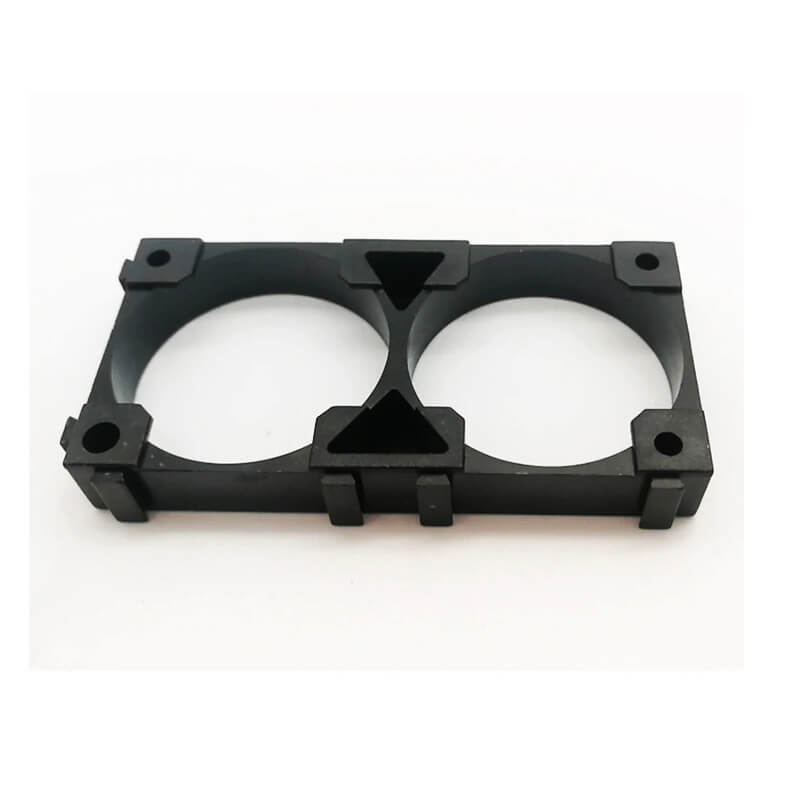
32700 LiFePO4 1x2 Battery Cell Spacer Holder Plastic Bracket (Pack of 2)
Battery Management System (BMS):
Battery Management System is used to protect the battery from overcharge and over-discharge. A LiFePO4 Battery needs to be charged at 3.65V Max per cell and should not reduce below 2.0 Volt. The BMS monitors these parameters and balances the cell. It also disconnects the battery from overcharge and disconnects when the current draw is higher than the specified range to protect the battery. By Managing these parameters, the life of the battery is increased.
I will be using 30A BMS as my load current will not exceed 25 Amps. To size your BMS you need to know how much load we need to run. For 30A BMS x 12.8 Volt, I cannot draw more than 384 Watts at the same time, the BMS will cut off the Load if it exceeds this limit. The 30A in BMS is the discharge current of BMS but not the charge current. It will also be mentioned in its specifications (it is 15A Max Charge Current in my BMS).
Important Note: For a 12AH Battery Pack it is recommended 10A BMS for within the safe Limits. In my case, I am going to add a few more in parallel (to increase capacity) in the future. So I used a 30A BMS.
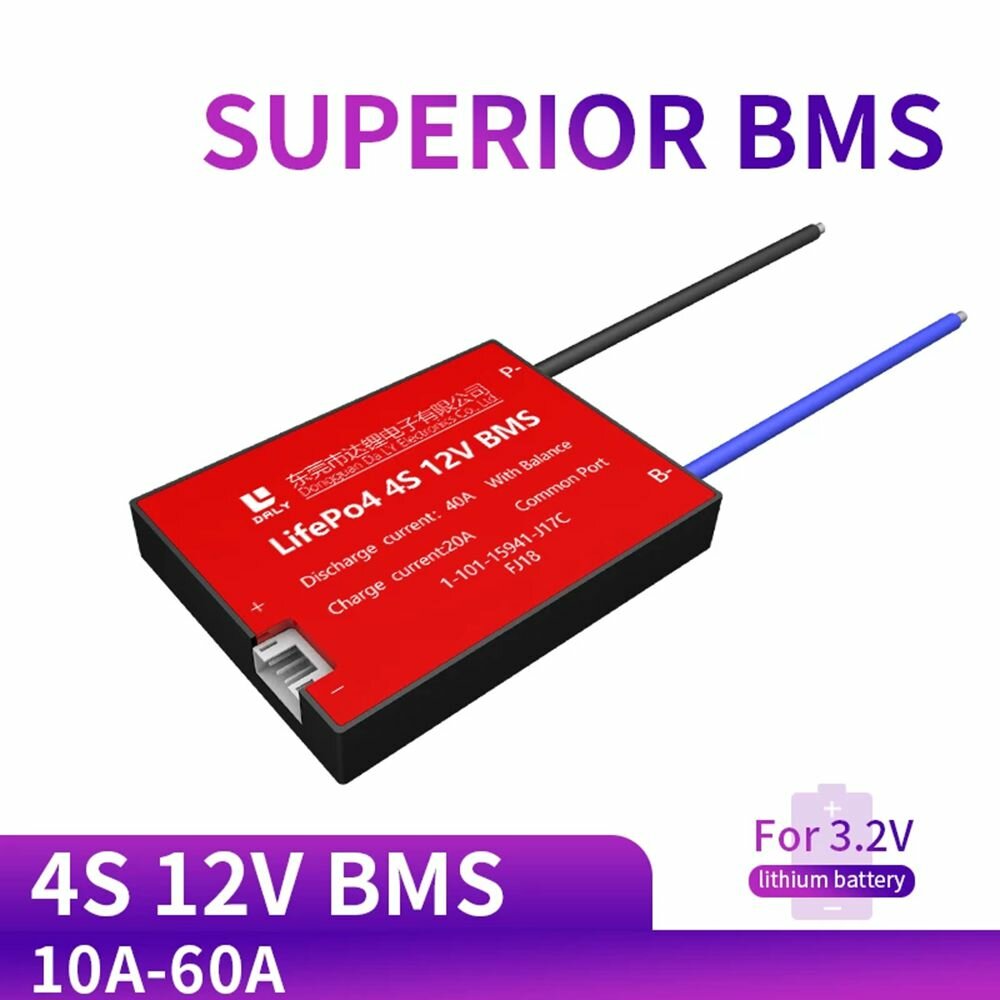
4S 12V Waterproof BMS for Rechargeable Lifepo4 Lithium Battery
Solar DC Wire:
A Good Quality DC Wire is made up of pure copper and coated with Tin to protect from Oxidation. Solar DC Wire also has a good quality Insulator for UV Protection, Waterproof, Temperature resistance because it is mostly used in outdoor areas. It is not recommended to use AC Wire in the battery packs because the Amp flow in DC wire is too high so it will make the wire hot and it can also heat the battery.
The wire size is mentioned in AWG (American Wire Gauge), in this higher the number very thin the wire is. The thicker and heavy gauge wire is 0 AWG, A Zero AWG Heavy Gauge wire is found in Automobile Batteries like Cars, Trucks, etc. Because the cranking amps for starting a Car will be higher than 150 Amps.
If you are having doubt in choosing the wire size, go with a wire size higher than your BMS P- or B- Terminals. There are 4sq. mm and 6sq. mm Solar Wires available in the market. But you should also consider the length of the wire as resistance increases when length increases.
So these are the basic important things to build a battery pack. I will explain each in separate blogs.
Building a 12.8 Volt LiFePo4 Battery Pack 4S2P:
Step 1: Check Battery Cells Voltage and Appearance.
Important: Check the LiFePO4 Battery voltage with a Multimeter. It is very important because batteries with voltage less than 2.0 Volt can’t be recharged. If we assembled the batteries, it is difficult to replace the damaged ones. So please check all the LiFePO4 Cells for voltage more than 2.5 Volts at least.
Also, make sure the cells are good and not damaged by crushing or leaking.
Step 2: Arrange the spacers together for our required structure. You can try different methods of assembly based on the size of the battery pack required. I follow this method for a 4S2P Configuration
Step 3: Mount the cells like the following in bottom spacer and place the top spacer pair. Make Sure the connecting heads of spacers are on the same side so that you can extend it in the future if required.
Step 4: Now using Spot Welding, we can weld the batteries for 4S2P Configuration. 4S Denotes 4 Cells of 3.2V are connected in Series to make a 12.8V Battery Pack (4×3.2V = 12.8V).
2P denotes 2 Cells in parallel where 6Ah x 2 increases capacity to 12Ah. If we want to increase the capacity of the same battery, we need to increase the Parallel Cells.
For easier understanding, I 3D Printed the spacers in 2 different colors. You can easily identify the top and bottom for spot welding.
Safety Instruction:
Important: Do not short terminals or place metals on the surface of the battery terminals. It will cause fire or can damage the battery. After completion, it is recommended to use a protective wrap.
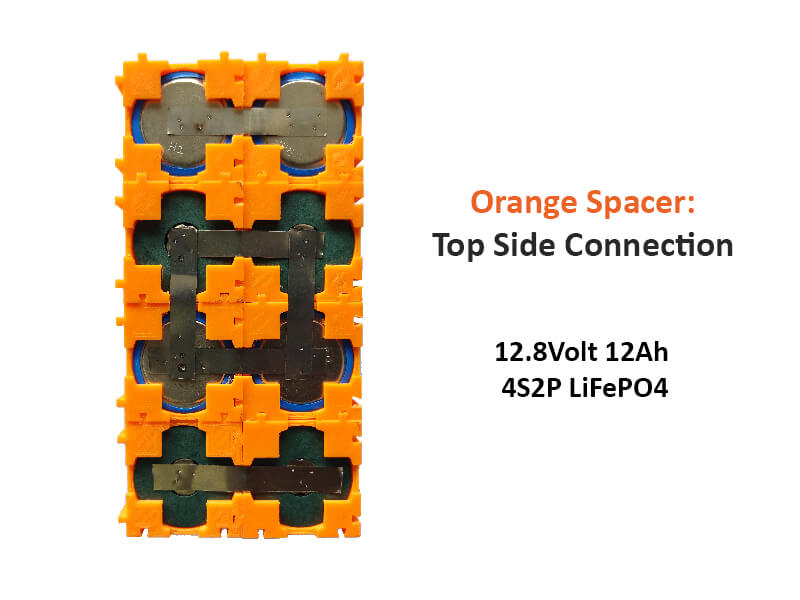
Top Side Connection (Orange Spacer):
After the spot welding, the top looks like this (Orange Spacer)
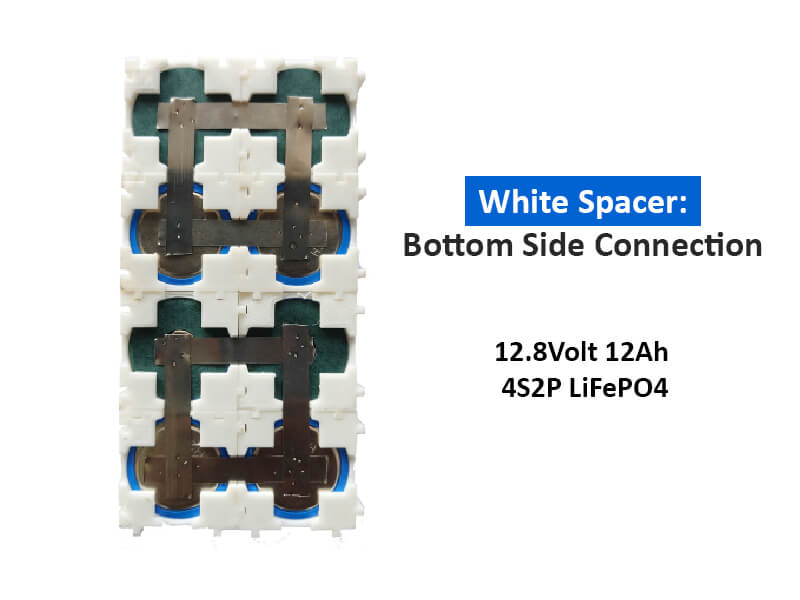
Bottom Side Connection (WhiteSpacer):
The bottom (White Spacer) looks like this
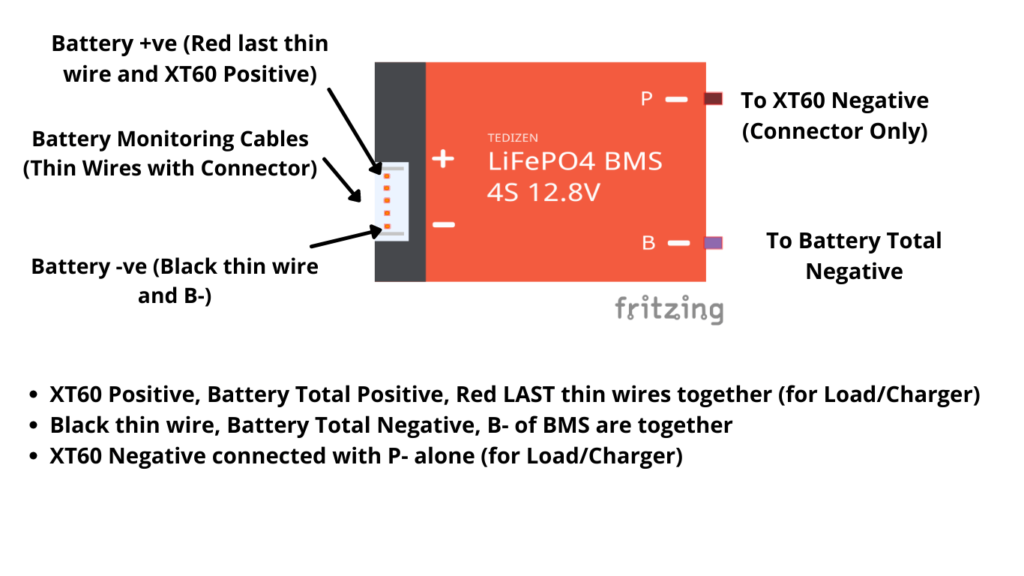
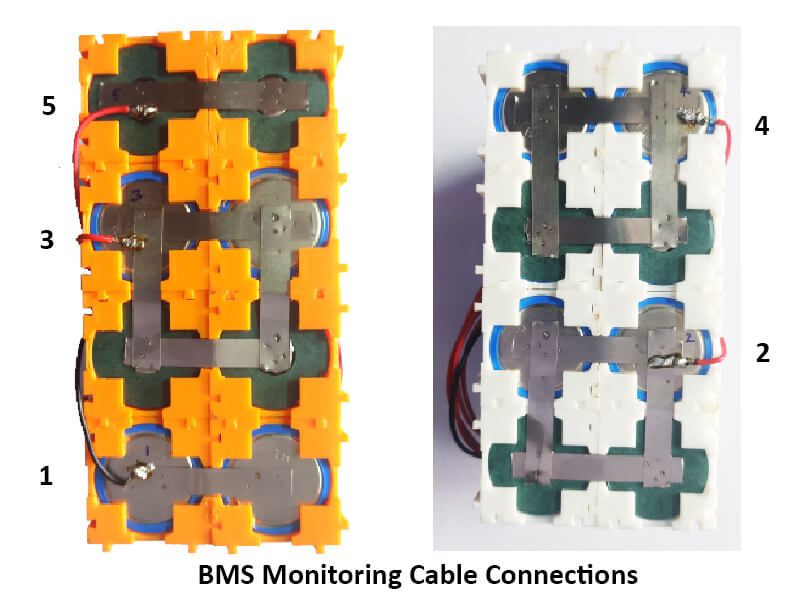
Step 5: Connect 4S BMS for our 4S Battery Pack. The below diagram is for pin details of LiFePO4 BMS. Circuit connection is given below for better understanding.
4S LiFePO4 Battery Pack Connection Diagram:
Note: In the following image, you can only able to see 4 Cells in Series as it is shown in front view. The other 4 Cells are invisible (Parallel) and you can refer it with the battery pack top/bottom image for understanding. You can increase the Capacity (Ah) by adding 4 Cells in parallel up to n numbers as required for your requirement. The voltage remains 12.8 V as it is 4S.
I have given color codes to easily identify the different wires. The different wires with their color code are mentioned below:
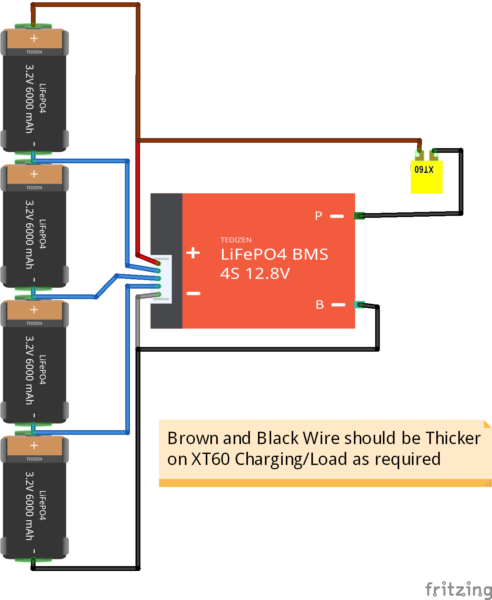
Brown – Thick Wire Positive
Red – Monitoring Cables Thin Wire Positive (Last Red Thin Wire)
Blue – Monitoring Cables via connectors
Grey – Thin Wire Negative (First Thin Black Wire of monitoring cable)
Black – Thick Wire Negative
We need to start connecting the monitoring wire from the grey (black in BMS Wire) and then one by one. It also suits any other number of series connections as well. The grey wire (black thin wire) is the first monitoring wire that needs to be connected at the total negative of the battery, then the next thin red wire in between the 1st & 2nd Battery. Then the next thin wire in between the 2nd & 3rd Battery. Similarly the next until the Total Positive. From the total positive we can connect it to XT60 Connector Positive. It can be used for both Charging and Load.
The P- Terminal of BMS is only connected to XT60 Negative Terminal.
The BMS Connections will look like the following, the connections are marked on the pack as well as on the image for easier understanding.
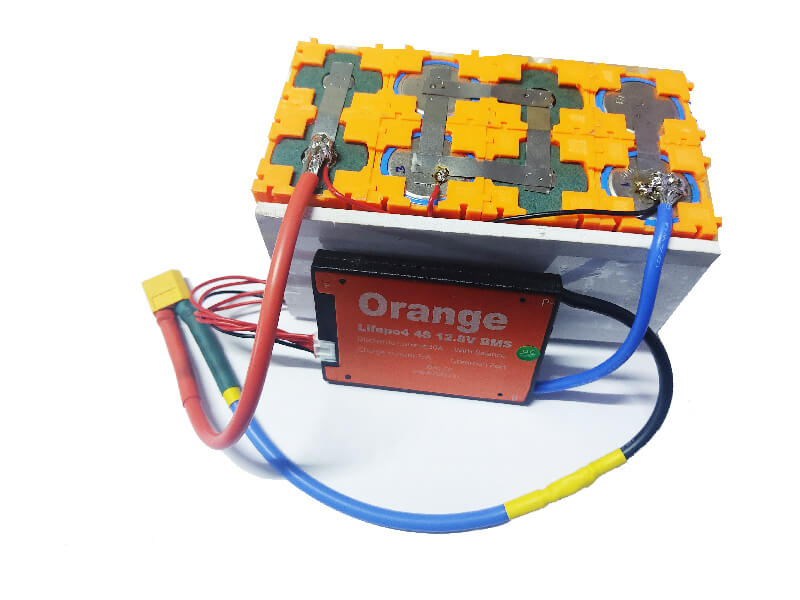
Now we have completed the connection of our battery pack. We need to test it for charging and load tests. If all works perfectly, we can put a heat-shrink sheet to protect it from external substances, short circuits, water, and dust.
Charging Requirements for 12Volt LiFePO4 Battery (4S):
We know the nominal voltage of single-cell LiFePO4 is 3.2Volt. As it is a 4S Battery Pack, 4×3.2Volt = 12.8 Volt Nominal Voltage.
As per the datasheet, we can charge a Single-Cell LiFePO4 battery at 3.65 Volt. The total charging voltage will be 4 x 3.65V = 14.6 Volts maximum charging voltage for the 4S LiFePO4 Battery. So the recommended voltage range to charge Lithium Ferro Phosphate Battery is between 13.6V to 14.4 Volt (100% Capacity usage). It is important to stay within these limits. You can also charge at 12.8 Volt (min), but the capacity is not completely utilized. Below is the chart explains how the cycle life affected based on the voltage limits.
Lithium batteries can be charged as fast as 1C (i.e 30% to 100% of its capacity). But recommended charging rate is at less than 0.5C (Eg. 12Ah Battery can be charged at 6 Amps or less for a better lifetime). The charging current can also be similar to the battery capacity.
So a 12Ah Lithium Battery can be charged at 12Amps. But charging fast makes the battery warm and it reduces the lifetime. So be within limits. Reducing the Amp of Charger takes a long time for charging.
The charger should cut off the charging automatically when the battery is full. We can use lead-acid chargers with LiFePO4 batteries as the charging voltage is similar. But when using a BMS, the BMS will cut off when the battery is full, so few chargers detect the battery is dead or disconnected. So it is recommended to use the dedicated charger for LiFePO4 batteries.
If you want to learn more about charging lithium batteries, visit PowerSonic.
Applications of LiFePO4 12 Volt Battery Pack:
- 12V Solar System
- Industrial Robots
- Battery Sprayers
- Car or Van Solar Power System
- Mini DC Solar System for Home
Please refer to the technical specifications before using them with your applications and chargers.
LFP (lithium ferrophosphate) uses a graphitic carbon electrode with a metallic backing as the anode and LiFePO4 as the cathode material. These batteries are used in utility-scale stationary applications and backup power, special purpose vehicles. Many battery suppliers are available in the market. But if you want to buy the best one then https://robu.in/ is the right place for you. Because it is the leading organization in India to provide the best quality lithium batteries with a warranty.