
Many of us aware that Salesforce is a Popular CRM Giant in the world that introduced many cloud business solutions. It started as a Cloud CRM Application and later focused into many areas of every business needs like Sales Cloud, Marketing Cloud, Commerce Cloud, Experience Cloud, Industries Cloud, and Customer 360.
In 2015, Salesforce launched its Salesforce IoT Cloud product (IoT Explorer). Most of you searching to enable it and found out it is not available on your org. The reason is that Salesforce took away Salesforce IoT because it felt that instead of making a separate product, it focused on improving its ‘Lightning Flow’ to implement those IoT features. Lightning Flow is also part of the platform license that comes with most Salesforce editions. Official notification of IoT explorer retirement can be found here. You can also check the status of all Salesforce product retirements here.
IoT Devices are internet-connected devices that follow similar functions to what most of our web apps do from HTTP Requests, API, JSON, MQTT, etc. We will explore Apex, RESTful Web Services, HTTP Requests, and Salesforce Sites for our project.
Requirements:
- Raspberry Pi Pico W
- micro USB Data Cable
- Free developer edition Salesforce Org
- Thonny Python IDE
- microPython Firmware installed on Pico W
When creating Salesforce Developer org, you can give any name in the company name. The E-mail address can be identical for multiple org but the username is unique. After signing up it takes a few minutes to create your org, you will get notified once it is ready. From the email, you can set a new password for your org (you need to enter your username here).
Overview of our project:
- We will be publishing the data from Pico W into a Salesforce custom object called ‘Sensor Data‘.
- The Pico W will collect sensor data and frame the URL with temperature parameters.
- After that, we create an apex RESTful Service that will parse the temperature data from the URL Parameters and store it in the ‘Sensor Data‘ custom object.
- We will be using salesforce sites as public to simplify the authentication process.
Update: I am currently testing with authentication tokens, later found something called HTTP Callout (in Beta) and Named Credentials from Salesforce Flow. This will take care of the authentication process without exposing the credentials in a simple manner without code.
Warning:
We are currently using public access to push data easily. It is not a recommended method in production. You might require security and authentication methods as needed.
Initial setup requirements in Salesforce:
- Create a custom object and fields in Salesforce.
- Create a RESTful Web Service and give public access.
- Create a Public Site in the org and allow public access.
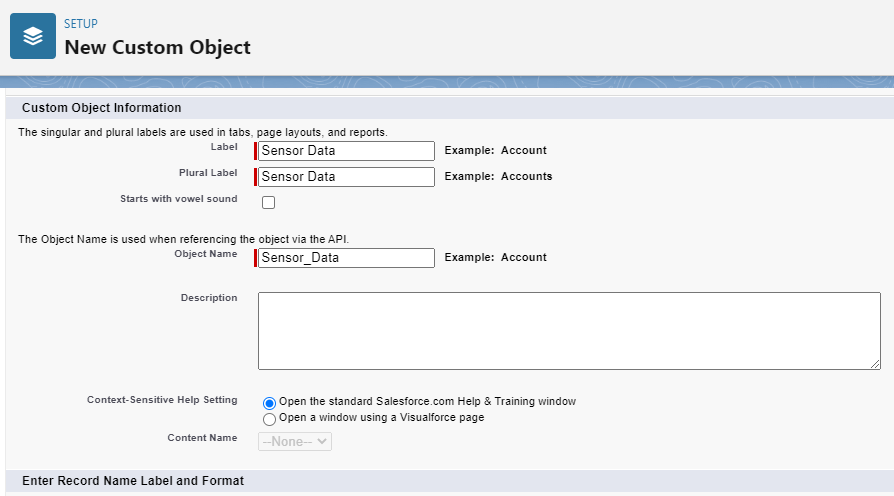
1. Create a Custom Object and Fields in Salesforce:
In Setup>Object Manager> Create> Custom Object.
- Label: Sensor Data
- Plural Label: Sensor Data
- Object Name (API Name): Sensor_Data
- Data Type: Text
Keep the remaining default and save.
On viewing the Sensor Data Object Detail tab, choose Fields and Relationships to create our fields as below.
| Field Label | Field Name | Datatype | Comments |
| Celsius | Celsius | Number (5,2) | Temperature data in Celsius |
| Fahrenheit | Fahrenheit | Formula (Number – Return type) | (Celsius__c * 1.8)+32.0 |
Leave default field level security (with System Administrator) and page layout for each field.
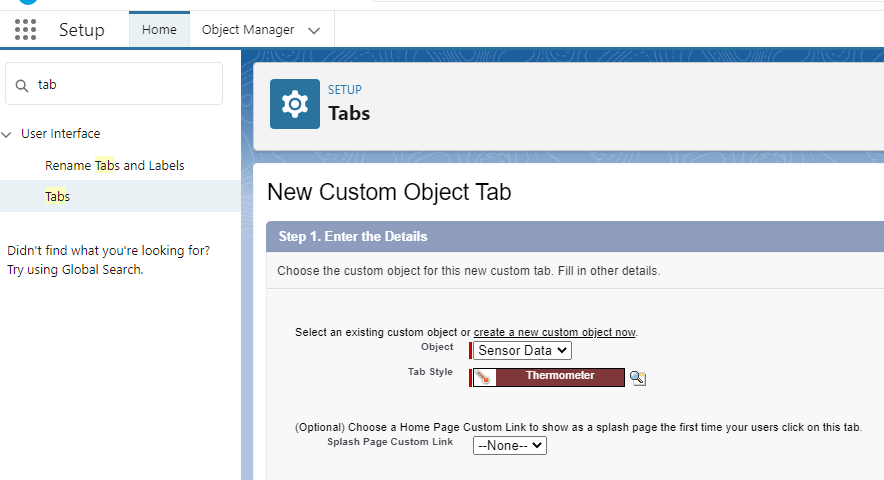
Create a custom tab so that you can make it accessible in all your apps.
2. Create a RESTful Web Service and give public access.
We will create an apex restful web service and make this class public to the site’s DataLoggerSite profile. Create this class from the developer console or search apex class in setup and create this class. The name will be chosen automatically based on the Class Name.
@RestResource(urlMapping = '/pico')
global class PicoService {
    @HttpGet
    global static void doGet() {

        //Set the response as plaintext
        RestContext.response.addHeader('Content-Type', 'text/plain');

        //Parse the temperature value from the parameter
        String tempReading = RestContext.request.params.get('temperature');

        //Convert the string value to Double
        Double tempDoubleReading = Double.valueOf(tempReading);

        //Create a new record
        Sensor_Data__c temperatureRecord = new Sensor_Data__c();
        temperatureRecord.Celsius__c = tempDoubleReading;

        try {
            //Insert the temperature value, if success, send success response
            insert temperatureRecord;
            RestContext.response.responseBody = Blob.valueOf('Success');
        } catch (Exception ex) {
            //If the insertion fails, send error response
            RestContext.response.responseBody = Blob.valueOf('Error');
        }
    }
}
We have a class called PicoService with a Static Method doGet(). Before the doGet() we have a decorator @HttpGet this will make the method as an HTTP Method.
3. Create a Public Site in the Salesforce Org:
The first time, you need to register your domain by accepting the terms of use. It will ask for a pop-up stating you can’t change the URL. Click Ok (as it is a developer org).
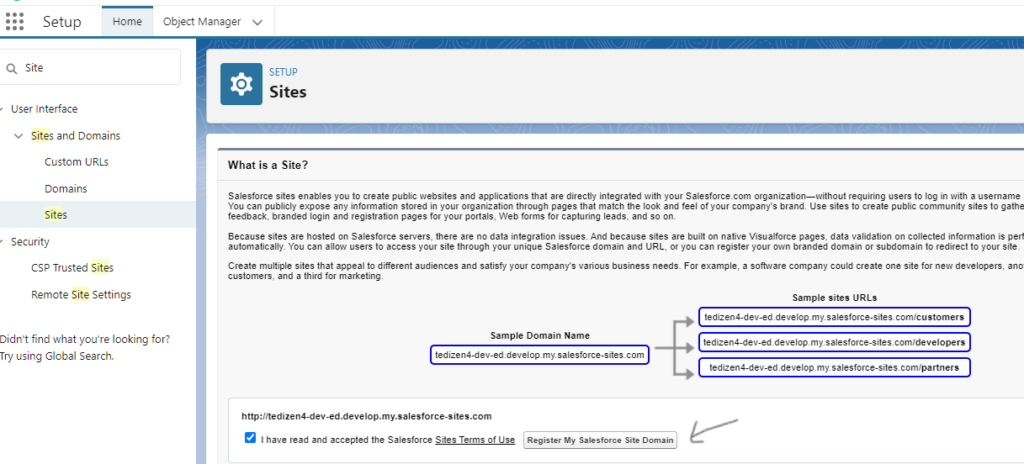
After registering the salesforce site, create your new site by clicking New.
- Site Label: DataLoggerSite
- Site Name: DataLoggerSite
- Active: Checked
- Active Site Home Page: AnswersHome (Click lens and select)
Keep the remaining settings default and Save.
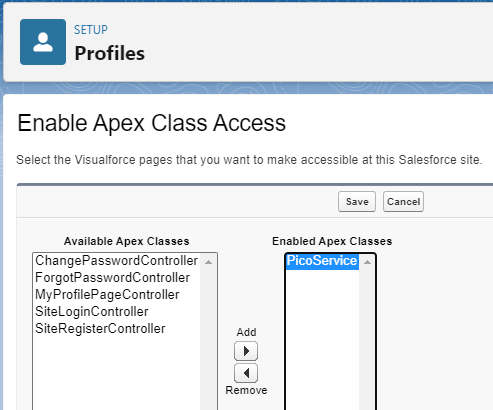
Choose the Public Access Settings button on the DataLoggerSite page.
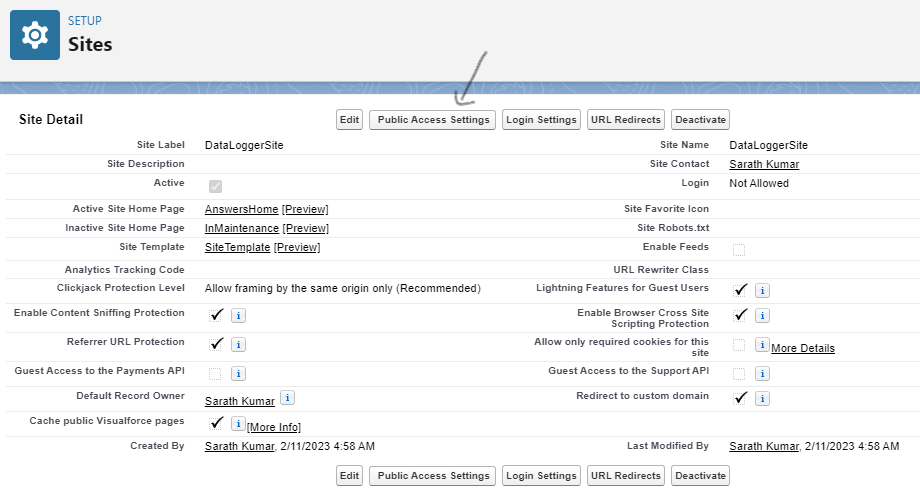
After that, hover on Enabled Apex Class Access and click edit, On the left pane select PicoService and click the ‘Add’ button to move to Enabled Apex Class Pane. Click Save.
Here we have given access for Apex Class PicoService to access our DataLoggerSite.
We successfully completed our salesforce configuration. Now you can test if the service works by manually publishing data in the URL and checking your custom object.
The URL part is confusing part that which one to use. You will have different URLs, but we use only the DataLoggerSite URL that we created. Because we gave the public access to this URL only. Org URLs can’t be accessed without usernames and passwords.
If you click the Site URL of DataLoggerSite, it will take you to the answers home (that we set previously as the homepage). You need to remove the ‘answers’ path and include the ‘services’ path (/services/apexrest/ along with resource path pico (in Apex Class)) and then pass the temperature parameter in the URL with a question mark in the front.
Example URL Format for testing on your browser (Replace Yours):
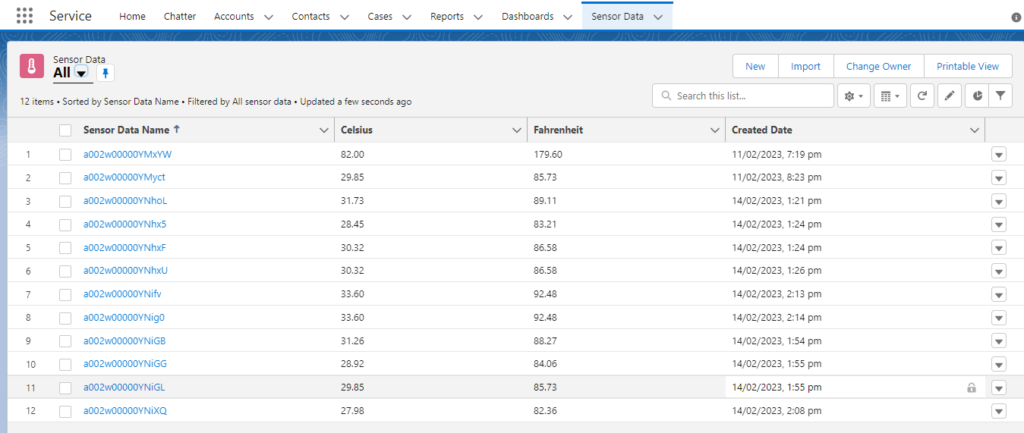
https://yoursiteurl-dev-ed.develop.my.salesforce-sites.com/services/apexrest/pico?temperature=82It will show ‘Success’ response on the webpage. If you go to the Sensor Data Object you will see the data gets logged (manual refresh needed). If you can’t see any records choose All List view, click the cog wheel and choose ‘Set Fields to Display‘ and add your fields.

Now we know all salesforce configs are perfectly working fine. Now we need to simply implement it on our Raspberry Pi Pico W.
Hardware setup for uploading sensor data to Salesforce Custom Object:
Raspberry Pi Pico W comes with an onboard temperature sensor, so we do not require any other hardware and wiring in this project.
If you are new to Raspberry Pi Pico, you need to first set up the Thonny IDE and set up microPython. You can follow the setup instructions here.
Optional – You may also need to install packages needed for pico called ‘picozero‘, it will provide access to hardware functionalities of Raspberry Pi Pico in an easier way for LED, Buzzer, Buttons, etc.
What is microPython?
MicroPython is a version of the Python programming language for microcontrollers, such as your Raspberry Pi Pico W. MicroPython lets you use your Python knowledge to write code to interact with electronic components.
Note: Make sure you have selected Micropython (Raspberry Pi Pico) as the interpreter, otherwise you will get module not found errors.
Raspberry Pi Pico W Code for URL Requests:
import network
import urequests
import machine
import utime
ssid = "YOUR_SSID"
password = "YOUR_PASSWORD"
urlpath = "https://yoursiteurl-dev-ed.develop.my.salesforce-sites.com/services/apexrest/pico?temperature="
publish_delay = 60 #Publish time delay in seconds
def connect():
#Connect to WLAN
wlan = network.WLAN(network.STA_IF)
wlan.active(True)
wlan.connect(ssid, password)
while wlan.isconnected() == False:
print('Waiting for connection...')
utime.sleep(1)
ip = wlan.ifconfig()[0]
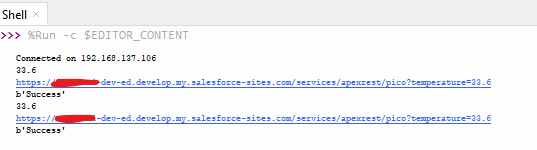
print(f'Connected on {ip}')
try:
connect()
except KeyboardInterrupt:
machine.reset()
sensor_temp = machine.ADC(4) #Internal Temperature sensor Pin at ADC 4
conversion_factor = 3.3 / (65535)
while True:
#Voltage to temperature conversion formula based on datasheet
reading = sensor_temp.read_u16() * conversion_factor
temperature_celsius = 27 - (reading - 0.706)/0.001721
temperature_celsius = round(temperature_celsius, 2)
print(temperature_celsius)
# Make a GET request
publish_payload = urlpath + str(temperature_celsius)
print(publish_payload)
r = urequests.get(publish_payload)
print(r.content)
r.close()
utime.sleep(publish_delay)You need to update these details on the code with your credentials, publish delay is the time taken for the next update in seconds. Salesforce has some limitations on your developer org, so we are updating values with 1 Minute intervals.
ssid = "YOUR_SSID"
password = "YOUR_PASSWORD"
urlpath = "https://yoursiteurl-dev-ed.develop.my.salesforce-sites.com/services/apexrest/pico?temperature="
publish_delay = 60
Note that, the higher delay may cause watchdog timer errors, so you may need to use RTC or fake HW Clock for hourly and daily intervals.
Once you run the code, you can see the status response in the shell, it shows success if the data is successfully uploaded. You can verify that in the Sensor Data Object in Salesforce Org.
If you are not getting the correct time, you need to set your time zone to your country on View Profile Icon> Settings> Language & Time Zone.
Result: Temperature data gets logged every 60 Seconds in Salesforce ‘Sensor Data’ Object
In this tutorial, we used the onboard sensor to upload it to the cloud. You can create your own sensor data in its variable and update those into the Salesforce fields accordingly.
You can use a flow or Apex Triggers for additional functionalities like emailing a person when temperature levels are abnormal, emergency shut down, Log Cases, Escalation Rules, etc.
Useful Reference Links:
Getting started with Raspberry Pi Pico
Product Buying Links: