When I first used the TTGO E-Paper display, I got the libraries, but it didn’t work properly with my E-Paper Display (Screen went Black after the code uploaded). Then I finally found there is a new header file that was not updated in the example code. So you need to include that header file to use the example code. For now, I will explain how to use the TTGO E-Paper Display with Arduino IDE. Currently trying out a few simple projects with this, later on, I will publish those here.
First, You need to install the ESP32 Boards on the Arduino IDE. You can follow this tutorial to do it.
After the setup, we need to go ahead and download the libraries needed for TTGO E-Ink Display. The dependency libraries are given in the GitHub Page.
Step 1: Goto the TTGO Library, and click on clone and download. After downloading, go to the Arduino IDE, select Sketck>Include Library> Add .Zip Library, then choose the downloaded file from gitHub. Now the TTGO Library Added. Next, we need to install the dependent libraries.
Step 2: In similar way as we did in the previous step, Install the following libraries from GitHub Page.
Thes libraries are some dedicated functions that are used in the Example code. When you do projects, you can remove the unnecessary codes and include only the needed functions.
Now we have installed the boards and all dependent libraries.
Step 3: In TTGO E-Ink Example, we will be using the ESP SPIFFS memory to store data and HTML code. The SPIFFS is like flash memory, you can add any code in that and delete it as you do in the hard disk. For uploading contents to the SPIFFS, there is a tool called ESP32 Data Upload. We need to install it.
Download and Extract the ESP32FS File. Now you have to move the content to the path
<home_dir>/Arduino/tools/ESP32FS/tool/esp32fs.jar
Make sure the esp32fs.jar file inside this path. Then restart the IDE. Now you can able to see an additional option in Arduino IDE like this
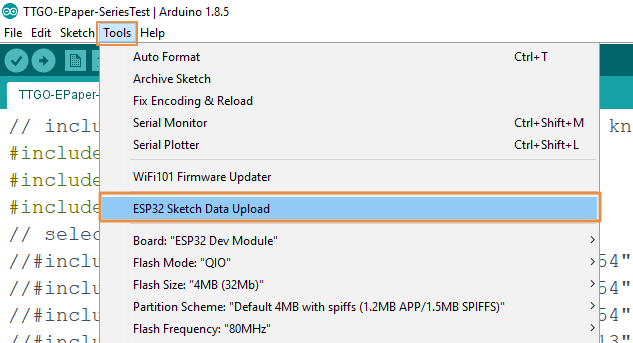
Detailed official instruction available here.
Usage of SPIFFS Memory
- Open a sketch (or create a new one and save it).
- Go to sketch directory (choose Sketch > Show Sketch Folder).
- Create a directory named
dataand include any files that you want in the file system there. - Make sure you have selected a board, port, and closed Serial Monitor.
- Select Tools > ESP32 Sketch Data Upload menu item. This should start uploading the files into ESP32 flash file system. When done, IDE status bar will display SPIFFS Image Uploaded message. Might take a few minutes for large file system sizes.
Using the above method, you can add any contents into the SPIFFS Memory of ESP32. The files won’t be deleted, even when the power is lost. In our example, we need to upload the contents needed for our code. It is included in the data folder of our Library File.
Inside the same sketch folder create a .ino file (must have a folder of the same name) and copy-paste the example.
Step 4: Now open the TTGO Example Code and modify the following contents
I have included this header file in the code for my board size & version (rest of the similar lines are commented out).
#include <GxGDE0213B72B/GxGDE0213B72B.h> // 2.13" b/wI uncommented the following line and changed the Wi-Fi name and Password in the code. If you don’t uncomment the code, it works on AP Mode and you have to connect it to the ESP Name and Configure. In station mode you can use your own WiFi network that assigns an IP Address.
#include <GxGDE0213B72B/GxGDE0213B72B.h>      // 2.13" b/w
#define WIFI_SSID "myWiFiName"
#define WIFI_PASSWORD "myWiFiPassword"
CODE:
Choose the Board Name as DOIT ESP32 DEVKIT V1 and Choose Port. After uploading you will get IP Address on Serial Monitor (Default Baudrate is 115200)
After the code uploaded, on serial monitor, you can get the IP Address. Copy and paste it in your browser and hit enter. Now the HTML Page that you uploaded on the SPIFFS will be displayed in a well-formatted HTML Page.
Modify the contents, in it and choose commit. This will save the entered data into SPIFFS Memory and update it on the screen.
Note: The Tel Number should be 18503000000. When I change this to any other it didn’t work. I have to check what might be the issue.